
Building a Sport Jet speed model.
I had wanted to fly control line speed models since the early 1980’s when I used to get engine tuning help with my pylon race models from Bill Bessant. For those of you who did not know Bill, he was a member of the Southampton Club for most of the 1960’s and 70’s and during this period Bill had won the UK Nationals in C/L speed with a very unusual Cox Tee Dee 09 powered model.
So I made contact with Dick Hart and bought an upright Sport Jet kit and Dicks very nice PCPJ Sport Jet engine.

Sport Jet kit
The kit is quite comprehensive and includes a really nicely made metal fuel tank and all of the correct control hardware to take the 145mph flights and the BMFA specified safety pull test. All of the wooden components with the exception of the tailplane were profiled by a router and are produced in ‘Bass wood’, Bass is something like Obeche as used to veneer foam wings but with a tighter grain structure.
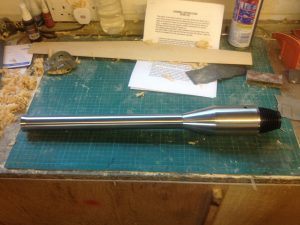
PCPJ Sport Jet on work bench
I started construction by shaping the 3/32” plywood tailplane and cutting the tailplane dihedral joint on the centre line. Dick was very insistent that tailplane centre line joint was reinforced with glass fibre, so that was done next.
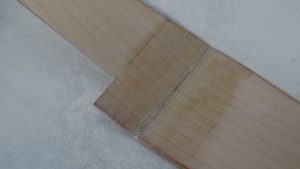
Tailplane reinforced centre joint
The fuselage is really a mini log type affair, however the corners are all radiused prior to the installation of the wings and tailplane.
Fuselage radius’s and wing mounting area
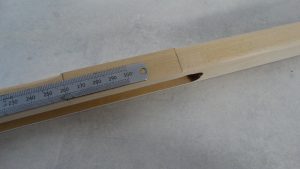
Installation of the tailplane was easy, using the new BSI® cyanoacrylate adhesive that I was trialling at the time. The most involved piece of crafting work in the airframe was shaping the 1/4” Bass wood wing to a decent airfoil section, this work was carried out with a selection of planes and sanding blocks.
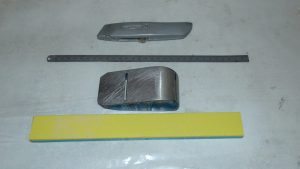
Selection of carving tools for shaping basswood wing

Guidelines marked on wing blank for LE, TE and tip
The wing is mounted to the top of the fuselage with a slow setting epoxy adhesive, the joint is assisted by the installation of two 6mm wood dowels that tie the wing to the fuselage top.
All of the hardware to mount the pulse jet is included in the kit, after a trial fitting of the hardware and engine, I was ready to paint the model. As you can see from the photo of the engine, it is a work of art. I thought that this in turn meant that the engine deserved a decently finished model, so I decided to go for wet look full gloss paint job.
I started off by filleting all of the wing and tailplane to fuselage joints with Plastic Padding, this material has been my choice for this kind of fillet for many years as it has some fillers within it that make it strong and less brittle than conventional fillers. After giving the model a final once over with 240 grade wet and dry (used dry) I apply one coat of BSI® Epoxy Finishing resin, this is really a sealer and once cured is sanded back and another coat of resin is applied, once the second coat is completely cured, I dry sanded the airframe using a hard block with 240 through to 400 wet and dry paper. After the epoxy is sanded over, I applied a nice automotive 2K white primer called Kapci, this pretty similar to the old K&B white primer but a lot cheaper and is available on Ebay amongst other places. Once the primer is dry/cured it is sanded back to a translucent condition and is then ready for colours.
I sprayed the white tail end of the model first, for the colours I used automotive base colour car paints which using a spraying mask was carried out by my shed door. Once the white was dry, I masked that off to apply the red wings and nose. I used a stencil to apply my BMFA number to the right wing.

I then applied a very light coat of Awlgrip ‘Awlcraft 2000 clear lacquer over the whole model for the real wet look, once cured this was given a quick buff for the final finish.